You have an amazing model coming over to shoot fashion nudes with you. But the only place you have to shoot is your tiny dining room. What do you do?
Shooting studio fashion can be very rewarding, but studio rental fees can be prohibitive if you’re just starting out or only shooting for fun. And, if the rental fees don’t faze you, the hassle and risks of transporting your gear might.
One solution is to temporarily turn your own home into a studio. If you’re lucky enough to have the money and space to build a permanent studio with high ceilings and tons of space, congratulations, you can stop reading. But what if your home is like the typical British house with pokey little 16 square meter (172 square foot) rooms?
For some kinds of shots, the amount of space you have doesn’t necessarily have a large impact. A head shot, assuming you don’t really mind what the lighting is going to be, can be done anywhere. However, what if you have a particular look in mind, or need to shoot full lengths? That’s where the challenges of shooting in limited space start to present themselves. Overcoming these challenges can increase your creativity and make any photo shoot even more fun.
The model was inspired by a high contrast B&W photo she’d seen featuring a pose that revealed the nude form, yet retained modesty. So that’s what we set out to do, and the photo below is what we ended up with, but how did we get there?
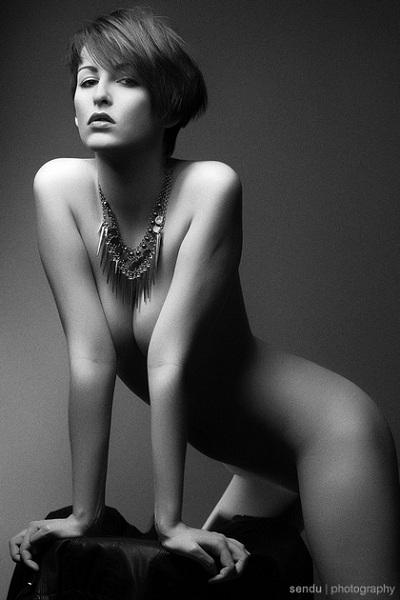
Photographer: R-a-n; Model: Amber TL
Shooting in small spaces
My dining room is 3 meters (9’10”) wide x 3.2 meters (10’6”) deep, with normal 2.4 meter (7’10”) high ceilings. As you can see from the photos, this is quite literally the smallest width room you can get away with and still put up a standard 2.72 meter wide paper roll.
A paper or cloth background isn’t always necessary, especially if you have a plain white wall to work with. However, in small spaces, where you’re unable to control the exposure of the background by moving the model further from it, having different shades of grey paper can help immeasurably with getting the background shade you were hoping for.
In this case, I knew I wanted a dark background to contrast well with the model’s light skin tones, so I used the dark “Charcoal” grey Colorama roll that you can see on the floor. With insufficient space for normal stands to hold the roll up, I use sturdy autopoles and the Manfrotto Expan system to raise and lower the paper.

All furniture was removed from the room; luckily I have double doors leading out of the dining room, so shifting the dining table was easy. If you’re not so lucky and are stuck with a table that’s getting in the way, consider just turning it upside down and having the model stand in the middle of it.
For this photo I didn’t want the model to cast a shadow on the background, and I wanted my key light to light both the model and the paper. So that meant I needed her close to the backdrop, but not too close – in the end I had her about 1.2 meters (3’11”) away from it.
The other important consideration is your distance from the model. Push comes to shove, in a small space you can just use a wide angle lens and shoot close. But, as in this case, the unnatural perspective that results may not be the look you wanted. So I used a fixed 85mm lens to frame her as desired, putting me around 2.2 meters (7’3”) from her – and outside the room. You may often find that the solution to shooting in small rooms is to shoot from another room, corridor or even from outside, pointing your lens through a doorway or window.
How to control light
Controlling light in a small, temporarily repurposed room is one of the greatest challenges. My dining room has white walls and ceiling, and to the left, out of shot, is a conservatory that lets in bright sunlight – with no doors or blinds able to block it out. Usually, on an overcast day or when the sun isn’t streaming directly into the room, this kind of indoor ambient light can be killed simply by shooting at your camera’s sync speed or higher (I use 1/125s) and an aperture of f/8 or higher. At around these settings an exposure will create a black frame, leaving you to then light the scene as desired with a studio strobe or flash gun. However the white surfaces remain a problem, robbing photos of contrast and depth as the light from your strobes bounces around the room.
To bring the light under control in this photo I used a gridded beauty dish on a Bowens Gemini 500pro strobe. The grid limits where the light goes to a narrow beam. The light was placed as close to the (low) ceiling as I could get it, next to and slightly in front of the model, to camera left. It was aimed down and toward the paper for the desired one-light setup.
To further eliminate any bounced light from hitting the model I used Interfit flat panel reflectors with the black sides on either side of her. These flat panels are the equivalent of polyboards, but roll up and are easy to store.
The lighting now gave the desired high contrast, with the bright face, dark background and deep black shadows on her body to show form without being explicit. But I found that her back leg was lost in that shadow, creating too much of a shapeless mass at the bottom of the photo. So I added a second bare-bulb strobe, low down, pointed at her leg, flagged from the camera and the rest of her body by the left flat panel. This also had the effect of lighting the paper more in the bottom left, which I felt added to the feel of the image.
The finishing touch was the necklace, purchased by the model for this shoot, which both added interest and prevented too large an expanse of featureless skin dominating her form.